semakin lama anda uli, adunan akan bertambah lembut (fine)
boleh guna yis basah(beku)dan hasilnya lebih baik.
minyak mazola bolah diganti dengan minyak masak atau mentega/marjerin yang dicairkan
2) CAKUI
400 gm tpg gandum
4 gm yis segera
1/2 sdb shortening
1 sdb marjerin
1 biji telur
1 sdb susu pekat/ gula
secubit garam
+ - 1 1/2 cwn air
ku cairkan marjerin then sejukkan, pastu masukkan telur dan kacau sebati. yis di larutkan dlm air dengan 1 sdt gula dan biar kembang. Satukan tepung dengan garam, shortening dan susu. gaul sebati. kemudian masukkan campuran telur dan marjerin and masukkan yis dan air. kacau sebati dan perap lebihkurang 3-4 jam. Bentukkan dan goreng dlm minyak panas.
kuah kacang
5 btg cili kering - digoreng dlm minyak
1 labu bwg besar - dipotong kasar dan digoreng hingga layu tak perlu hingga garing
sengengggam kacang tanah - digoreng tanpa minyak
gula, garam dan air asam jawa - sesedap rasa
blend cili kering dan kacang tanah bersama air dlm blender. blend atau tumbuk bawang yg digoreng tadi. panaskan minyak tumis bawang dahulu dah naik bau dan agak garing masukkan kacang dan cili yang dah diblend. tambah air jika perlu. kemudian biar didih seketika dan masukkan gula, garam dan air asam sesedap rasa.
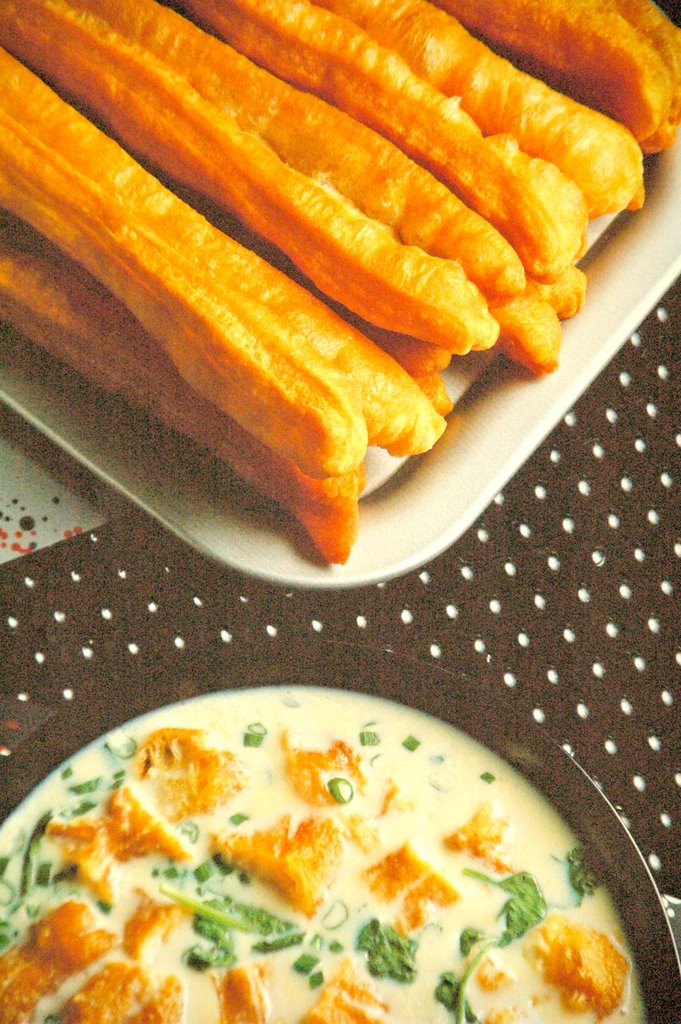
3) Yau Char Kwai
Our group of Malaysian ladies attempted making Yau Char Kwai this month. We tried out two recipes and one turn out really well and one failed miserably. Not sure what went wrong with the failed recipe as we follow the ingredients and instructions to the T. Anyhow, we were glad Agnes Chang recipe turns out so well with less work and proofing time compare to the other one. The YCK were light with hollow texture on the inside. So the next time if we are going to make this again we will just stick to this recipe.
For more information about the Chinese Crullers/Yau Char Kwai please readhere. As for more information on Ammonia Powder please refer to here. For me information for Alum please refer here .
Ingredients A
(Adapted from Agnes Chang’s Hawker’s Delights with minor changes)
1 tsp dried yeast
1 tsp sugar
2 tbsp lukewarm water
Ingredients B
250 ml water
1 tsp baking soda
½ tsp Ammonia powder (chow fun)
½ tsp of Alum (pak fun)
Ingredient C
300 grm bread flour (we used 320 grm)
1 tsp salt
(I put both successful and failed YCK together for comparison. Just look at the difference in size)
1. Mix all the ingredients A and set it aside for 10 – 15 minutes until it get foamy.
2. Mix ingredients B. Sift ingredient C into a mixing bowl. Add in mixture of A and B into the flour. Used a wooden spoon, mix the dough until well combined. Knead it for 5 minutes and if the dough is too sticky to work with add a little bit more flour.
3. Cover with a plastic wrap and let the dough rest for 2 hours.
4. Turn the dough out to the well floured work surface. Sprinkle some flour on the dough and roll the dough out into a long rectangle. Cut into 1” strips. Place two strips, one on top of each. Let it rest for another 5 minutes.
5. In the meantime, prepare oil for deep frying.
6. Press lightly on the two strips of dough with a chopstick. Holds both ends of the dough and stretch the strips a little and lower into hot oil. Deep fry, turning constantly until each cruller turns puffy and golden brown.
Note: The dough is pretty sticky to work with so make sure your work surface, hands and utensils are well coated with flour.
4) PA THONG KO (THAI VERSI)
I chuckled when reading up on the history of these Chinese crullers, you tiao (油条), which have been localized in Thailand into Pa Thong Ko (ปาท่องโก๋).
According to the widely-circulated Chinese folk etymology, these pairs of dough sticks apparently represent two evil people who deserve to suffer in hot oil. To the Thai people, the conjoined crullers represent something cuter and more romantic: a couple who are deeply attached to one another and seen together all the time. Symbols and figures of speech behave like that across the various cultures. The Zealous Water Buffalo, my alter ego, has written about these things.
Another funny thing about Pa Thong Ko: it is a misnomer resulted from confusion on the Thai’s part over the various goodies sold by Chinese immigrants from years ago; it’s not even a localized pronunciation of the original Chinese, but a wrong name altogether. We could have gone with something close toyou char kway (油炸粿) or something similar to that as the Chinese words that have entered our vernacular often come from the Hokkien or Teochew dialects. But, apparently, a mistake was made a while back and it has stuck with us ever since. In other words, unless you speak to someone who knows Chinese, your inquiry about youtiao or you char kway in Thailand will be met with a,”Huh?“
More differences.
Pa Thong Ko comes in smaller size — generally around 3-4 inches in length whereas youtiao could be as long as a couple of feet. Also, when I was growing up — maybe it’s my imagination — Pa Thong Ko seemed to resemble their Chinese prototype more both in terms of appearance (blistered, bubbly, crispy exterior) and texture (soft and slightly chewy with honeycomb-like crumb). These days, they seem to have morphed into crullers that look smoother on the surface, more crusty than crispy on the outside, and doughy on the inside. Rarely do you find Pa Thong Ko made the way they were years ago. (I’m not complaining; I’m just reporting what I’ve found. In fact, what you see here is my attempt at replicating Pa Thong Ko as they are made these days, albeit more crispy than crusty.)
Also, the Thai people like to eat these crullers with sweetened condensed milk, coffee, or dipping custard, Sangkhaya (สังขยา). They are also served with Chinese congee, jok (โจ๊ก).
Note that there’s another kind of fried dough that is also called Pa Thong Ko, but it’s almost entirely different from what’s in view here. This type of Pa Thong Ko is smaller, fried until thoroughly crispy, and served as an accompaniment to Chinese-style soybean curd in warm ginger syrup (เต้าฮวยน้ำขิง).
Enough with the background information. Let’s talk about how to make these crullers.
First of all — and this may sound harsh — assuming my opinion means anything to you: if you see recipes for Pa Thong Ko that don’t call for both baking ammonia and alum powder, I wouldn’t even think about messing around with them. I’m serious. That’s the whole point of being a recipe tester: I waste my time and money, so you won’t have to. And, boy, did I do just that. With just baking powder, your Pa Thong Ko will be doughnut-like, and you and I both know Pa Thong Ko aren’t doughnut-like. With just baking soda, your Pa Thong Ko come out crusty (as opposed to crispy) on the outside and hollow on the inside. Again, we both know that doesn’t describe good Pa Thong Ko.

My recipe takes no chances. It has ammonia, alum, and yeast. Baking powder is added at the last stage just before the dough is formed to give it a lift in the deep-fryer. The result is Pa Thong Ko with open crumb (but not hollow) and crispy exterior. When you bite into one, it collapses between your teeth. No bouncy resistance as is the case with yeast doughnuts.
The ammonia also gives the crullers that familiar scent that’s just faint enough to be pleasantly reminiscent of Pa Thong Ko from the streets of Bangkok, but not so strong that it reminds you of … I’ll shut up now.
I’ll admit, though, that even though this recipe represents my best attempt to date, I still won’t give it an A or an A+. Maybe a B+. I’m satisfied with the texture and flavor, but shaping the dough into pairs of Pa Thong Ko in a uniformed manner is still a struggle for me.
This is because the dough is wet. It has to be wet; otherwise, you won’t get the open crumb. Adding more flour to the dough defeats this purpose. Keeping the flour at this amount presents a bit of a problem for an amateur Pa Thong Ko maker like me as the two pieces of dough tend to merge together a little too seamlessly. You see, well-formed pairs of Pa Thong Ko kind of have to remain visibly two separate entities conjoined in the middle. It’s going to take some practice.
 The rest is pretty easy, actually. The recipe has produced very consistent results for me during the past several months of testing and retesting. Be sure to secure all the necessary ingredients. Alum powder is found either in the spice aisle or canning aisle. Ammonia powder is a little harder to find at a local supermarket, but you can find it online easily.
Lastly, have some sweetened condensed milk around — like I need to tell you that — to dip these crullers in. I don’t care much for Pa Thong Ko dipped in Thai dipping custard (sangkhaya), but sweetened condensed milk — hohohohohoho.
5) CHINESE CRULLER | 
 Place the crispy You Tiau, dried shrimp, Szechuan pickled mustard green, green onions, coriander, pork sung ( dried pork shredded/ Abon ), vinegar, chili oil, soy sauce, sesame oil, and salt in a medium size bowl. Pour the boil soybean milk into the bowl and serve.


No comments:
Post a Comment