Saturday, June 1, 2013
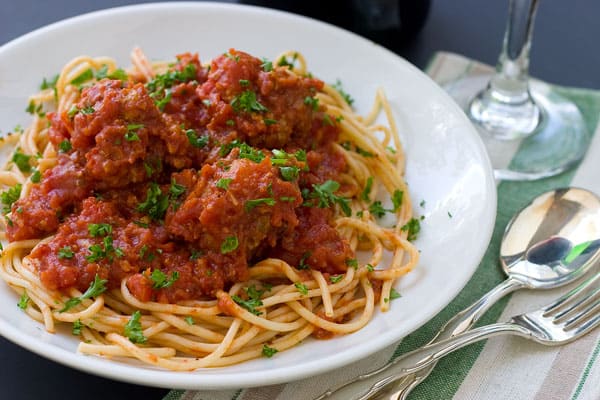
Spaghetti Bolognese
450g meatball
1 medium sized onion
chopped garlic
chopped tomatoes
chopped carrots
250g sliced mushrooms
1 tb/s paprika (depending how spicy you want it to be)
2 tb/s extra virgin olive oil
400g tomato paste/concentrate
*salt to taste
Spaghetti
400g spaghetti
3/4 t/s salt
1 1/4 t/s olive oil
water
Method:
Bolognese sauce
1. Peel and chop the onion and garlic.
2. Clean the minced beef with a lemon.
3. Chop tomatoes and carrots in cubes.
4. Pour the olive oil into a deep saucepan or pot. Heat it and fry the onion, garlic and paprika until
translucent.
5. Add the minced beef and fry until the beef is brown and crumbly.
6. Add tomatoes, carrots, sliced mushrooms and tomato concentrate.
7. Bring to boil. Add salt to taste.
Spaghetti
1. Bring the water to a boil.
2. Add the olive oil and salt, then the spaghetti.
3. Cook till 'al dente'.
4. Once done, drain the water and run cold water on the spaghetti so that it doesn't become sticky.
Serve with grated parmesan and basil leaves.
Bon appetit!
Friday, May 24, 2013
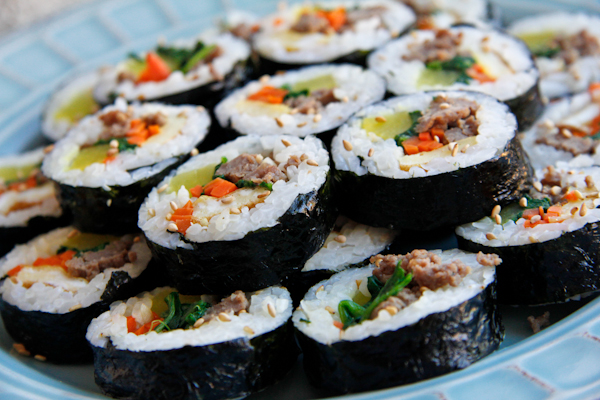
Kimbap (김밥) Korean Rice Roll
Ingredients:
6-7 Sheets dried laver seaweed
A 9 or 10 oz bag of ready to use spinach1 large carrot, or 2 medium sized carrots, peeled
5 Eggs
Kosher salt, divided
Sesame oil, divided
Olive oil, divided
Roasted sesame seeds, divided
6-7 Sheets dried laver seaweed
A 9 or 10 oz bag of ready to use spinach1 large carrot, or 2 medium sized carrots, peeled
5 Eggs
Kosher salt, divided
Sesame oil, divided
Olive oil, divided
Roasted sesame seeds, divided
Beef Ingredients:
1 lb ground beef
2 cloves garlic, finely minced
3 Tbsp soy sauce
2 Tbsp sugar
2 tsp sesame oil
1 lb ground beef
2 cloves garlic, finely minced
3 Tbsp soy sauce
2 Tbsp sugar
2 tsp sesame oil
Rice Ingredients:
6 cups cooked (3 cups uncooked) short grain or sushi rice
½ Tbsp sesame oil
½ Tbsp olive oil
½ Tbsp toasted sesame seeds
¼-½ tsp kosher salt, or to taste
6 cups cooked (3 cups uncooked) short grain or sushi rice
½ Tbsp sesame oil
½ Tbsp olive oil
½ Tbsp toasted sesame seeds
¼-½ tsp kosher salt, or to taste
Directions:
for the beef:In a bowl, combine all the ingredients for the beef. Mix everything together by hand and set it aside to marinate while you prepare the other ingredients. When all the other ingredients are prepped, and the beef has had time to marinate, heat a large pan with some olive oil and fry the beef until it is nicely browned. Remove the beef with a slotted spoon into a bowl and set aside.
for the carrots:
Peel and slice your carrot(s) thinly on a diagonal. Lay the slices flat and run your knife through them lengthwise to create thin julienned slices. Saute them in a pan with some olive oil and season with a couple pinches of salt to taste. Set aside.
for the eggs:
Break 5 eggs and add a couple pinches of salt. Whisk well. Heat a large pan with olive oil over medium low heat. Use a paper towel to wipe the pan so that it is evenly coated. Pour in the eggs and let it cook until the bottom is firm and light golden brown. Flip the egg over and cook until light golden brown. Remove to a plate and cut the egg into half-inch strips. Set aside.
Break 5 eggs and add a couple pinches of salt. Whisk well. Heat a large pan with olive oil over medium low heat. Use a paper towel to wipe the pan so that it is evenly coated. Pour in the eggs and let it cook until the bottom is firm and light golden brown. Flip the egg over and cook until light golden brown. Remove to a plate and cut the egg into half-inch strips. Set aside.
for the spinach:
Add the entire 9 or 10 oz bag of ready to use spinach in salted boiling water. Boil for 30 seconds, and drain. Run cold water over it to stop the cooking, and squeeze out all the excess moisture with your hand. Transfer to a bowl and season with 1 teaspoon sesame oil, and a couple pinches of kosher salt. Mix well. Set aside.
Add the entire 9 or 10 oz bag of ready to use spinach in salted boiling water. Boil for 30 seconds, and drain. Run cold water over it to stop the cooking, and squeeze out all the excess moisture with your hand. Transfer to a bowl and season with 1 teaspoon sesame oil, and a couple pinches of kosher salt. Mix well. Set aside.
for the rice:
Mix the rice last. After all the ingredients are prepped and the beef is cooked, place the 6 cups of cooked rice into a large bowl, along with the other ingredients for the rice. Mix gently, and get everything ready for assembly.
Mix the rice last. After all the ingredients are prepped and the beef is cooked, place the 6 cups of cooked rice into a large bowl, along with the other ingredients for the rice. Mix gently, and get everything ready for assembly.

assembly and slicing:
Place a sheet of dried laver seaweed, shiny side down, on a bamboo mat. Starting from the bottom, spread some rice in a thin even layer, filling about ⅔ of the seaweed sheet.
All of the filling that goes on top of the rice should start at 1” from the bottom, and have 2” of rice above it. Place the egg first, make a gap in between them. In that gap, add your beef in a neat row. On top of the beef, place the carrot and spinach side by side, also in neat rows.
All of the filling that goes on top of the rice should start at 1” from the bottom, and have 2” of rice above it. Place the egg first, make a gap in between them. In that gap, add your beef in a neat row. On top of the beef, place the carrot and spinach side by side, also in neat rows.
Starting from the bottom, roll the seaweed sheet, using the mat. The first roll should land right where that excess rice is. That will help it stick together. Gently push and squeeze down on the bamboo mat. Move the mat a litttle further away from you, allowing the kimbap to roll with it. Again, squish down and press with your hands. Then wrap and roll the entire kimbap up in the mat. Squeeze firmly across the entire length of the mat to make the sure the kimbap is tight. If you’re having trouble keeping the seaweed shut, add a few grains of the rice at the edge of the seaweed sheet.
Use a brush or a gloved hand to put some sesame oil on the surface of the kimbap rolls. This adds flavor and helps keep the kimbap shiny. It also helps to add a little sesame oil to your knife blade. With a sharp knife, slice the kimbap into thin half inch or bite sized pieces. Kimbap is characteristically sliced thinner than Japanese maki. You can then sprinkle with some more roasted sesame seeds if you want. Pop it into your mouth and enjoy your hard work!
TIPS: For the summer time, instead of the marinated beef, you can use strips of cooked ham, and instead of spinach, you can either use thin strips of cucumber, or julienned perilla (sesame) leaves to lighten it up and keep it easy!
Also, they sell roasted sesame seeds in a plastic canister at the Korean market, so you don’t have to toast your own.
Source : http://chefjulieyoon.com/
Thursday, May 23, 2013
HOMEMADE KIMCHI (김지)
To make healthy kimchi that still has lots of flavor and health-promoting compounds, start with a whole head of fresh Napa cabbage:

Separate the leaves and chop them up into bite-size pieces. These shreds of cabbage will shrink about 25% during processing, so no need to make them too small. And no need to clean them yet, as we'll be giving them a good rinse in a bit.

Measure out a quarter cup of sea salt.

And add it to a small bowl of warm water.

Give it a gentle stir until the salt is dissolved.

Now add the salt water to the cabbage and give the cabbage a light toss to distribute the salt water.


Now a bit of waiting time. The salted cabbage needs to sit at room temperature for about four hours. The salt will help draw moisture out of the cabbage, and will also act as a natural preservative.
Here's what the cabbage should look like after about four hours:

If you look closely, you'll see a small pool of salt brine at the bottom of the bowl.
Now grease up your elbows and wash and strain the cabbage two or three times. You want to rinse off the salt water and return the cabbage to a large bowl.
Congratulations - this is the base for your kimchi.

Measure out a quarter cup of gochugaru, also known as fine red chili flakes/powder.

Add a quarter cup of warm water and mix with a spoon until the chili powder/flakes turn into a bit of a paste.

Transfer the red pepper paste to the cabbage.

Plus a tablespoon of minced garlic.

And a tablespoon of finely chopped/minced ginger.

Three to four green onions, sliced.

Two tablespoons of anchovy sauce or fish sauce. If you prefer a vegetarian version, you can skip this step.

And now for the secret ingredient that sets this kimchi apart from most commercially prepared varieties: a concoction of half a ripe apple, half a ripe pear, and half a yellow onion, all blended up with one cup of water.

This apple/pear/onion blend adds a hint of natural sweetness to the kimchi - most commercial varieties simply add a cup of sugar.
Now put on a pair of gloves so that you can get right in there and give everything a solid toss and rubdown. Gloves are necessary, as the red chili flakes/powder will make your bare hands burn.

And voila, you have homemade kimchi that should please even the fussiest of Korean food critics.

You want to bottle the kimchi up in glass bottles, cap them, and leave them out at room temperature for 24 hours before refrigerating.
One word of warning: don't fill the jars right up to their tops, as the contents will expand a bit as the kimchi ferments, and filling the jars to their rims will likely result in leakage.
Here's a look from up top:

And from the front in all its glory:

After 24 hours of fermentation out in room temperature, transfer capped bottles to the refrigerator and take portions out as needed. The kimchi will continue to ferment while refrigerated, and will keep for at least a month. The longer it ferments, the more sour it will get. Personally, I prefer kimchi that isn't sour at all, so we tend to use these bottles up within a week or so.
BEST OF LUCK!!!
No comments:
Post a Comment